Monday, 25 November 2013

Digital Manipulation (Quick 1st go)

Digital manipualation 

This is a piece I created starting with a quick sketch of me that my twin drew. 
Here I have scanned in the image and I open it up in photo shop. 

This is the scanned in image.

Here I select the image with the quick selection tool and then right click> Select Inverse, so that I am selecting everything but the image that I want to keep. 

I rub out all of the selection to get rid of the background of the paper. 

Here is the image after, to clean up the paper background within the piece I have to select the pieces I want rid of, also using the quick selection tool. 


This is he piece with all the background rubbed out. 

I select the hair and open up a new layer to work on this selection so to not edit the background image of the scanned sketch, 

I add my hair colour with a pastel style brush so I can create all the different tones that I have in my actual hair to make the character look more like me. 

I add more tones within the hair. 

I add a face colour also with the pastel style brush. 

Adding colour to the ears and eyes. 


As you can see, adding the face tone wiped out the darkness of the piercings.. 

I select a pencil tool to work in to the piercings and eyes. 


Using black tones I darken the piercings and add white highlights. 

I add more white highlights to the eyes lips and lip and nose peircings.

Colour and tone all done! 

Adding a oval frame I finish the piece.  


Digital Manipulation (Zombie Girl)

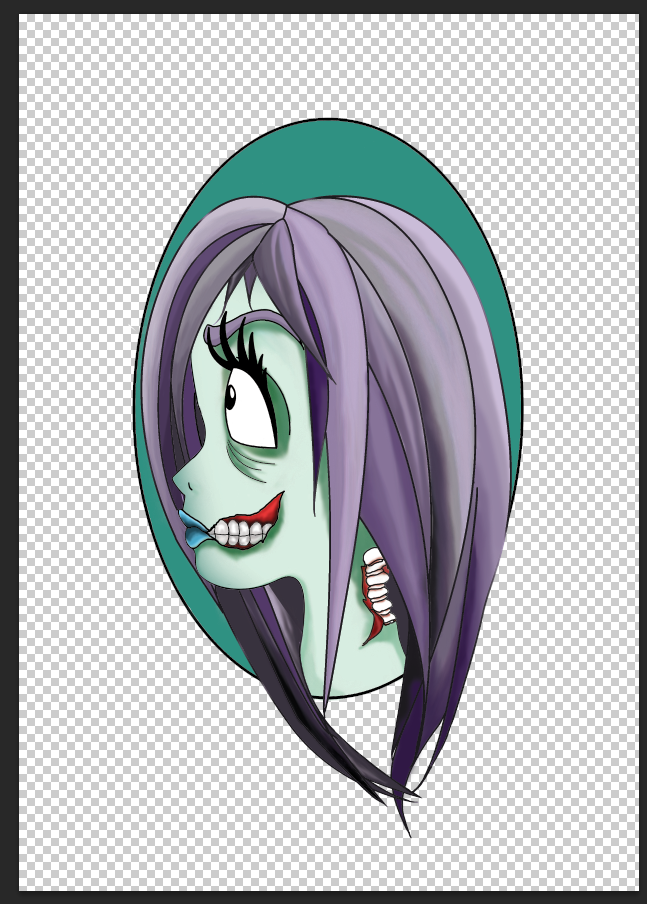
Digital work: Zombie Girl

Above: A quick sketch I did of a Disney style inspired zombie girl. Once I had completed this rough sketch I scanned it in to the computer and opened it up in Photoshop

This is the piece after I created the outline using a pen tool and making the oval frame from a oval shape tool. Once I was happy with the outline I removed the layer which contained the original sketch. 

This is the piece as I added base facial colour and started adding tone. I chose green so it showed zombie like qualities, I also made her lips blue to make her look more dead. I added tone in places that would need shade, like the eyes, under the mouth and around the revealing spine and under where the hair would be. I added the base colour with a hard brush and added the tone with soft brushed and used the blend and smudge tool to blend it out. 

Here I have added more tone and red tone around the flesh around the spine. 


Here I have added tone and colour around the gums and teeth and added base colour to the hair. I chose to use purple for the hair because I think it compliments the green in the face. I added the base hair colour with a hard brush, I also chose a lighter shade of purple as the base so I can add the darker and maybe a few lighter ones on another layer to create tone. 


Here is a piece in process of me adding tone to the hair to give the piece more depth and interesting qualities. I added the tone with soft brushes and blended them to make the hair look smooth using the smudge tool and blur tool. 

Here the piece is at its final and finished! I have added colour within the oval frame, I chose a green similar to the face to reflect these colours. 


Here is a screen shot of three main stages of my piece to show my development. The first is the original sketch, the second is my outline and the last is the final product. 


All done! This is the piece all done and I put it against a black background to make the girl stand out more. 


First Photoshop!

Here is my first play about with Photoshop.
To create this I played with different brushes and techniques to create a series of eyes. The largest eye and the eye in the top right eye were my final two, as you can see by the detail in these eyes I had gotten more comfortable with the software and graphics tablet by this time. If you compare these to my others and first eyes in the bottom left you can see the improvement. 

Thursday, 21 November 2013

Post graduate course opportunities that my BA(Hons) Degree can lead me to. (Professional Studies)

In this blog I am going to be looking at post graduate courses that my BA(Hons) Degree may be able to lead me to, and find out some more about those courses. To find these courses I went on a website that shows all of the Master degrees ect. that are available in the UK and others around the world. I used the course finder on this website to search for what I may be interested in.

Here are a list of some of the courses I found and thought I may be interested in:
My course will allow me to be able to enter any one of these courses if I complete it well, opening up a lot of opportunities for me. I think I am almost certain that I will be going on to do a Masters Degree, although I am unsure of what degree I am likely to choose yet. I think I am leaning more towards an Illustration based MA than a Fine Art based one, I am also very interested in Graphic Design and Creative Business based Degrees. I plan to research further, and take time on deciding on my course.

Career opportunities that my BA(Hons) Degree can lead me to. (Professional Studies)

In this blog I will be looking at what skills my degree is giving me and how they will help me getting jobs after the course and what sort of jobs these would be.

Here are a list of skills I am gaining through this course (List on CCAD website):
• Drawing techniques and media applications
• Digital illustration
• Printmaking
• Materials and equipment
• Composition and layout
• Contemporary trends
• Narrative illustration
• Decorative illustration
• Problem-solving
• Concept development
• Research skills
• Presentation and communication skills
• Professional practice
• Planning and organisation – meeting deadlines
• Working with clients
• Promoting and marketing your work
• Working in industry or self-employment

As you can see this degree will leave me with a very large skill set, enabling me to approach many different careers if I wish. Here are a few ideas for these careers, as told to me by the course description:

• Freelance illustrator or studio illustrator
• Book illustrator, including children’s books
• Fashion illustrator
• Greetings card illustrator/designer
• Illustration for magazines, editorials and advertising
• Illustration for products, eg. homeware, fashion accessories, stationery
• Working in publishing
• Printmaker
• Styling
• Project management and community arts
• Postgraduate study, eg. MA Illustration
• Postgraduate teaching qualifications
• Teaching and lecturing

This course will give me plenty of skills and opportunities to break in to the industry. As students we will already be working in the industry with live briefs and competitions in our second and third year, so by the time we complete our course we will be working well within the industry. This means our step from studying in to our proper career will be simple and smooth, meaning that we are able to enter any one of the jobs above, so we can do this while we also work towards bigger jobs.

Tuesday, 19 November 2013

Adam Calfee (Animator)

Adam Calfee is an animator I have found, as I am completing a brief on digital manipulation I have been looking at artists who use digital medias.
Adam creates amazing animations and his style is amazing and the videos he creates are attention grabbing and awesome.

Music videos
     - My Uncle Shoots Heroin by Ill Bill  
     - War is My Destiny by Ill Bill ft. Max Cavalera 

My part in the exhibition

I was asked to create a piece in an exhibition as part of a team, the team consisted of me and three others. The brief asked that the exhibition be based on Hartlepool and the people in Hartlepool, and we were asked to work together as a collaboration. 
Our team of four decided to look at alternative style people in Hartlepool and to do this we looked at tattoos and peircings ect. 

Here are some pictures of the work I added to the exhibition.
I drew on to the walls using pencil to create an outline of two large girls, the girls where about 6 1/2 ft tall. 
I painted the hair using black ink in different amounts of water to create the right shade. I wanted to keep the girls pale and grey so that the tattoo designs that would be added on would stand out a lot more. 

The hair I created on my girls faded out and joined in to the hair of a girl that was drawn by another member of the team I was in, to join this smoothly we attached the girls by the hair and slowly blended the hair from my style to his style. 
Once the bodies where done I added tattoo designs to the piece using bright colours.
I made some of the tattoos look as if they were coming away from the bodies and coming to life. 
The faces also featured more body modification concepts with piercing and I also painted the ears to be stretched.